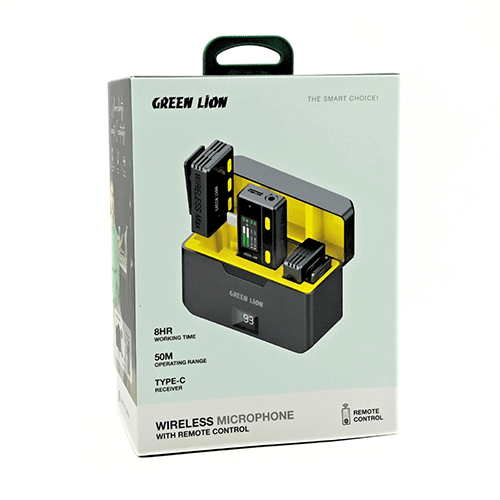
Green Lion Type-C Wireless Microphone with Remote Control in Kenya
Green Lion Type-C Wireless Microphone with Remote Control Price in Kenya is Kshs.8,000.Green Lion 3-in-1 360 Microphone is your wireless audio sidekick, ready to capture crystal-clear sound for up to 21 hours! Say goodbye to background noise and hello to clear recordings thanks to its smart noise-canceling tech. Buy Green Lion Type-C Wireless Microphone with Remote Control at best price in Kenya at Starmac.
It easily connects to any device with automatic pairing, and its 360° sound pickup ensures you never miss a beat.Plus, it’s portable and versatile, with both USB-C and Lightning connectors + Aux for easy connection. Experience high-quality audio with its impressive specs and long-lasting battery life. This microphone is the ultimate game-changer for all your audio needs!
How to use Green Lion Type C Wireless Microphone with Remote
1. Product Overview
- Components:
- Wireless Microphone
- Type-C Receiver
- Remote Control
- Charging Cable
- User Manual
2. Charging the Microphone and Receiver
- Initial Charge: Fully charge both the microphone and the receiver before first use.
- Charging Process:
- Connect the charging cable to the microphone and the receiver.
- Plug the other end into a USB power source.
- The LED indicators will show charging status (usually red while charging and green when fully charged).
3. Power On/Off
- Microphone:
- Press and hold the power button for 2-3 seconds until the LED indicator lights up.
- To turn off, press and hold the power button again until the LED indicator turns off.
- Receiver:
- Plug the receiver into the Type-C port of your device; it should power on automatically.
4. Pairing the Microphone and Receiver
- Automatic Pairing:
- When both the microphone and receiver are powered on, they should automatically pair.
- The LED indicator will turn solid (usually blue) when paired successfully.
- Manual Pairing:
- If they do not pair automatically, press and hold the pairing button on the microphone and the receiver until the LED indicators flash.
- Release the buttons and wait for the indicators to turn solid, indicating a successful pairing.
5. Using the Remote Control
- Power On/Off:
- Some remote controls may have a power button. Ensure it is turned on.
- Functions:
- Volume Control: Use the + and – buttons to adjust the volume.
- Mute/Unmute: Press the mute button to mute/unmute the microphone.
- Additional Functions: Depending on the model, there may be other buttons for echo control or changing channels.
- Pairing Remote:
- If the remote needs pairing, refer to the specific pairing instructions in the user manual. This typically involves pressing a pairing button on the remote and the microphone simultaneously.
6. Connecting to a Device
- Type-C Port: Plug the receiver into the Type-C port of your smartphone, tablet, or computer.
- Device Recognition:
- Ensure your device recognizes the microphone as an audio input.
- You might need to select the microphone in the audio settings of your device.
7. Operating the Microphone
- Volume Control: Adjust the volume using the remote control or buttons on the microphone, if available.
- Mute/Unmute: Use the mute button on the remote control or the microphone.
- Indicator Lights: Understand the meaning of different LED indicators (e.g., power status, battery level, pairing status).
MAECENAS IACULIS
Vestibulum curae torquent diam diam commodo parturient penatibus nunc dui adipiscing convallis bulum parturient suspendisse parturient a.Parturient in parturient scelerisque nibh lectus quam a natoque adipiscing a vestibulum hendrerit et pharetra fames nunc natoque dui.
ADIPISCING CONVALLIS BULUM
- Vestibulum penatibus nunc dui adipiscing convallis bulum parturient suspendisse.
- Abitur parturient praesent lectus quam a natoque adipiscing a vestibulum hendre.
- Diam parturient dictumst parturient scelerisque nibh lectus.
Scelerisque adipiscing bibendum sem vestibulum et in a a a purus lectus faucibus lobortis tincidunt purus lectus nisl class eros.Condimentum a et ullamcorper dictumst mus et tristique elementum nam inceptos hac parturient scelerisque vestibulum amet elit ut volutpat.


